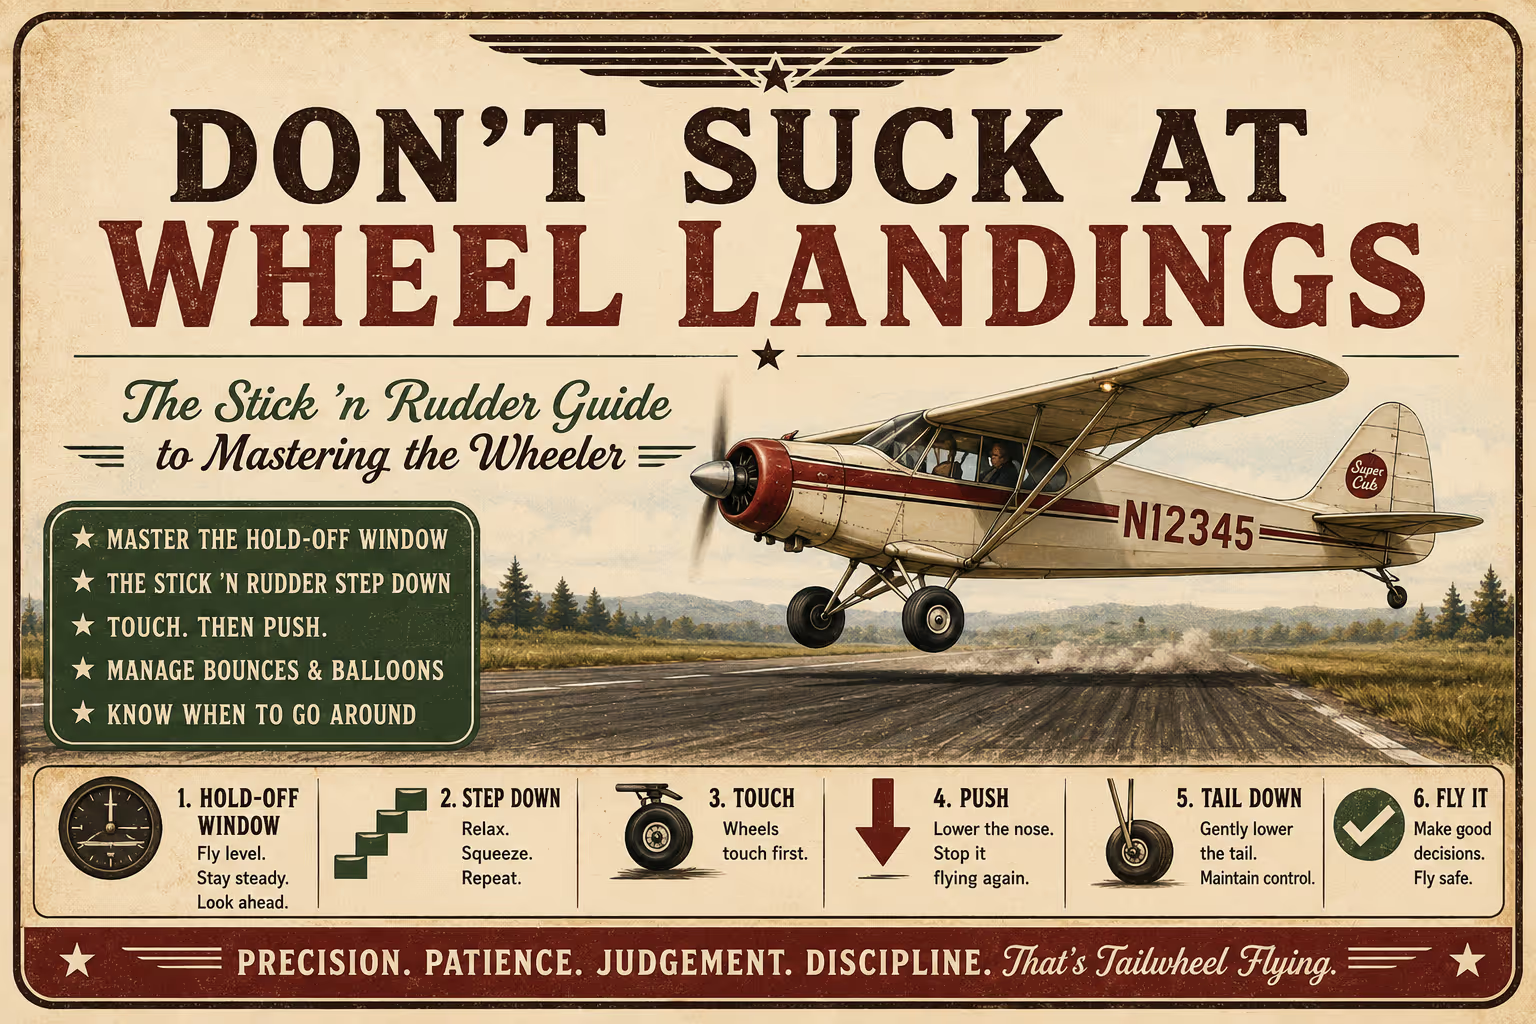
The wheel landing is one of the most misunderstood manoeuvres in tailwheel flying.
Many pilots believe a wheeler involves flying the aircraft into the runway and pinning it there. In reality, this is one of the fastest ways to create bounced landings, damaged landing gear and, in severe cases, prop strikes.
The most common wheel landing mistake is simple:
The Stick ‘n Rudder Step Down method takes a different approach.
If you’ve ever found yourself forcing the aircraft onto the runway, bouncing, ballooning or simply wondering why wheel landings sometimes work and sometimes don’t, you’re not alone.
The problem is that most pilots have never been taught a simple, repeatable process.
This guide provides exactly that, along with a collection of practical tips, exercises and techniques that will help you make wheel landings more accurate, consistent and safe.
Before you can master wheel landings, you must first master straight and level flight.
Sounds simple, right?
Most pilots learn to maintain altitude by constantly referencing the instruments. While the instruments are useful, the wheel landing happens close to the ground, where your primary reference should be outside the cockpit.
You should be able to fly the aircraft through its full speed range in smooth conditions while maintaining altitude using visual references and feel.
Key Principles
Watch the horizon.
Feel the seat.
Maintain a constant 1G.
Visual Cues
If the horizon appears to move upward in your peripheral vision and the seat feels lighter beneath you:
You’re descending.
If the horizon appears to move downward and the seat pushes upward against you:
You’re climbing.
You should be comfortable doing this from near stall speed all the way through to maximum straight and level flight.
Once you can do that, you’re ready for the Hold-Off Window.

What Is the Hold-Off Window?
The Hold-Off Window is simply a narrow band of airspace above the runway, typically around one foot high.
In reality, every landing passes through the Hold-Off Window. The difference is that most pilots are in a hurry to get through it.
By intentionally spending time there, you develop some of the most important skills required for consistent wheel landings.
The Hold-Off Window teaches pilots to fly accurately near the ground. It builds confidence operating in slow flight close to the runway and removes the pressure of the touchdown itself.
Perhaps most importantly, it encourages pilots to look well ahead toward the far end of the runway.
This naturally widens your field of view and allows you to sense subtle changes in the aircraft’s flight path. Instead of staring at the ground directly in front of the aircraft, you’ll begin to notice the horizon moving in your peripheral vision.
When the horizon appears to rise:
You’re descending.
When it appears to fall:
You’re climbing.
These visual cues become remarkably accurate once you learn to recognise them.
Fly down the length of the runway in smooth conditions while maintaining a constant height above the surface.
Do Not:
Try to land.
Try to touch down.
Instead:
Simply fly level.
The ideal wheel landing attitude is only slightly higher than your normal straight and level cruise attitude.
If you find yourself in the Hold-Off Window with the nose noticeably higher than this, you are simply flying slower straight and level flight.
Correction
Add a small amount of power.
Relax slightly on the stick.
Establish the desired pitch attitude.
Priority
Your priority is maintaining a constant height above the runway.
Remember
Use the stick to control your flight path.
Use the throttle to control speed.
Exactly as you would in straight and level flight.
Once you can comfortably fly in the Hold-Off Window, you are ready for the Step Down.
The Step Down is exactly what it sounds like.

Imagine the aircraft’s flight path resembles a series of small steps.
In the Hold-Off Window, maintain a small amount of power and trim the aircraft slightly nose-down so you are holding a little back pressure on the stick.
Then:
Relax.
Squeeze.
Relax.
Squeeze.
As you relax the back pressure, the nose lowers slightly and the groundline begins moving upward in your peripheral vision.
As soon as you see this, gently squeeze a small amount of back pressure on the stick.
This shallows the descent.
Ideally, the wheels touch the ground at this point.
If they don’t, repeat the process.
Repeat:
Relax.
Squeeze.
Relax.
Squeeze.
Until the wheels kiss the runway.
Key Principle
The smaller the steps, the better.
The best Step Downs are subtle.
From inside the cockpit, you’ll see and feel the small pitch changes that create each step.
To an observer on the ground, the elevator movement is often more noticeable than the aircraft itself moving.
This is a sign that you’re making the small, precise inputs the technique requires.
Common Errors
New pilots commonly make large pitch changes or end up flying level with the runway as they “squeeze” too much.
The Step Down is really a process of micro-adjustments.
A very common error is allowing the aircraft to slow down while stepping down.
As speed decreases, the nose attitude rises.
Corrections
If you notice this occurring, add a small amount of power.
If the nose is lower than desired, reduce a small amount of power.
Remember
Use the stick to control the flight path.
Use the throttle to control speed.
To understand why the push is important, we first need to understand why aircraft bounce.
The primary reason is the design of a tailwheel aircraft.
The centre of gravity sits behind the main wheels.
Whenever the tailwheel is off the ground, gravity naturally wants to pull the tail back down.
This is normal.
It happens by design.

The Sequence Looks Like This
Main wheels touch.
The tail begins to fall.
Angle of attack increases.
If sufficient flying speed remains, the aircraft flies again.
This is called a bounce.
If the touchdown is firm, the landing gear may also rebound, which can further contribute to the aircraft becoming airborne again.
The harder the touchdown, the more pronounced this sequence becomes.
Why Step 2 Is So Important
The smoother the wheels touch, the easier it becomes to complete Step 3 successfully.
Key Takeaway
The purpose of the push is not to put the aeroplane on the runway.
The purpose of the push is to stop it flying again.

Timing is critical.
Do Not Push Before the Wheels Touch
Do not push before the wheels touch.
This is one of the most common wheel landing mistakes.
It is also closely linked to the misconception that a wheel landing involves flying the aircraft into the runway.
A successful wheel landing is not about forcing the aircraft onto the ground. It is about accurately controlling the aircraft to the point of touchdown.
The Sequence
The wheels must touch first.
Then you push.
As soon as you feel the main wheels contact the runway, apply a positive but smooth push on the stick.
The goal is to reduce the wing’s angle of attack before the tail has an opportunity to fall and increase it.
The Amount of Push Required Depends On
Generally, aircraft with a more forward centre of gravity are easier to wheel land.
Aircraft with an aft centre of gravity generally require a more positive push.
Starting Point
As a starting point, aim to touch down in a pitch attitude slightly above straight and level flight.
When the wheels touch, lower the nose by approximately two or three finger widths.
You are not trying to force the aircraft onto the runway.
You are positively but smoothly keeping it there after accurately controlling it to the point of touchdown.
This reduces the wing’s angle of attack while increasing the downward force carried by the main wheels and landing gear.
After Touchdown
Once established, reduce power and continue moving the stick forward as required to maintain the attitude and the desired downward force on the landing gear.
As speed decreases, rudder effectiveness decreases.
Your rudder inputs will become larger and more frequent.
Transitioning the Tail to the Ground
Eventually, transition the tail to the ground and establish the three-point attitude.
Transition Too Early
Transition too early and the aircraft may fly again.
Transition Too Late
Transition too late and you may lose directional control, particularly in a crosswind.
As a general rule, it is better for new tailwheel pilots to transition the tail down slightly later rather than too early.
However, the tail should not drop or crash onto the runway.
Instead, it should naturally want to fall, with you gently guiding it to the ground without the main wheels becoming lighter.
After Tailwheel Touchdown
Once the tailwheel touches the ground, continue bringing the stick all the way aft until it reaches the elevator stop.
This is a very common error.
Many pilots stop pulling once the tailwheel touches.
Doing so can allow the tailwheel to repeatedly leave and re-contact the surface when rudder effectiveness is already low, increasing the risk of a loss of directional control.
Final Reminder
Bring the stick positively all the way back and keep it there.
Sooner or later you will bounce or balloon.
Expect it.
Particularly during your first hundred hours of tailwheel flying.
Yes, one hundred hours.
Tailwheel flying takes time to master.
A bounce or balloon is not a failure.
It is simply another opportunity to fly the aircraft.
The challenge is not the flying.
The challenge is the human response to being close to the ground.
When the aircraft bounces or balloons, it is flying again.
It is no different to flying the aircraft slowly at 5,000 feet above the ground.
Keep Flying the Aircraft
Keep your eyes up toward the far end of the runway.
Allow your field of view to remain wide.
Use the ground line and your peripheral vision to determine where you are relative to the Hold-Off Window.
Observe the aircraft’s pitch attitude.
Feel what the aircraft is doing.
Listen to it.
Assess its energy state.
Keep flying the aircraft.
When the Aircraft Becomes Airborne Again After the Bounce
1. Manage the Speed with Power
If the aircraft becomes slow, the controls feel sloppy, the sink rate increases rapidly, or the nose attitude becomes higher than desired, add power.
In fact, if in doubt, adding a small amount of power is often a good decision.
Power buys time.
It reduces the likelihood of a hard landing and gives you more options.
2. Control the Flight Path with the Elevator
The aircraft is flying again, so fly it.
Do not try to force it back onto the runway.
Maintain control of the flight path and smoothly return the aircraft to the Hold-Off Window.
3. Return to the Hold-Off Window
Establish the correct wheel landing attitude and speed while flying level with the ground.
Treat the situation exactly as you would any other wheel landing.
You are simply back in the Hold-Off Window.
4. Perform Another Stick ‘n Rudder Step Down
Relax.
Squeeze.
Relax.
Squeeze.
Touch.
Push.
Power off.
Treat it as a completely new landing.
Do not try to salvage the original one.
Fly a new one.
Establish a Decision Point
Before every landing, establish a clear decision point.
If the aircraft is not doing what you want by that point, go around.
Do not negotiate with yourself.
Do not keep trying to save it.
Make the decision and execute it.
Final Reminder
A go-around is not a failed landing.
It is good judgement.

Good tailwheel pilots make good decisions.
The simplest rule for new tailwheel pilots is this:
Two bounces or it’s not straight — go around.
Simple.
Stay With Your Chosen Landing Technique
A wheel landing should not become a three-point landing.
A three-point landing should not become a wheel landing.
Choose your landing technique.
Execute that landing technique.
Manage any bounce or balloon.
Recover back to that landing technique.
Or go around.
The Consequence of Hesitation
The fastest way to join the Ground Loop Club or the Prop Strike Club is hesitating after you’ve already decided the landing is not working.
Final Reminder
A go-around is not a failed landing.
It is good judgement.
Go-Around Sequence
Power full.
Attitude set.
Fly away.
One of the best exercises for mastering the wheel landing never leaves the ground.
I call it the Wheel Run.

The Wheel Run
Begin a normal takeoff roll.
As soon as the aircraft reaches the wheel landing attitude, reduce power and maintain that attitude.
Use the stick to control the pitch attitude and maintain sufficient downward force on the main wheels, allowing the aircraft to ride over bumps in the runway surface without large attitude changes that may cause it to fly again.
Use the throttle to control speed.
Power Management
Too Much Power
Too much power and the aircraft will accelerate and fly.
Too Little Power
Too little power and the tail will fall back to the ground.
The Goal
The sweet spot is somewhere in between.
Safety Precaution
As a safety precaution, do not lower the nose below the normal straight and level flight attitude during this exercise.
If too much power is applied, allow the aircraft to fly.
Do not continue pushing forward in an attempt to keep it on the runway.
If the aircraft wants to fly, let it fly.
Why the Wheel Run Works
The Wheel Run removes the pressure of the landing as a required outcome.
Instead of focusing on touching down, the pilot focuses entirely on maintaining the correct wheel attitude and managing speed.
Conducting the Exercise
This exercise should be conducted with caution.
Use a long runway.
Operate in calm conditions.
Have a predetermined point at which you will either continue the takeoff or terminate the exercise.
In most cases, continuing the takeoff is the safer option than attempting to decelerate to a stop.
Advanced Practice
As your confidence develops, you can introduce small amounts of bank and operate on a single main wheel.
This builds confidence for future crosswind takeoffs and landings.
No more than five degrees of bank is required.
The Goal
The goal is not to show off.
The goal is to develop precision.

One of the most important disciplines in tailwheel flying is establishing a personal crosswind limit.
Not the aircraft’s limit.
Your limit.
Build Your Limit
Check the forecast.
Consider alternatives.
Know when to say no.
Every experienced tailwheel pilot started with a low crosswind limit.
Build yours progressively.
Do not borrow somebody else’s.
Conditions change.
Forecasts help.
Surprises don’t.
Have a Plan
Have a plan.
An alternate runway.
An alternate aerodrome.
Hope is not a crosswind strategy.
There is no prize for discovering your limit during a ground loop.
The best tailwheel pilots make their hardest decisions before takeoff.
Final Thoughts
Tailwheel flying is more demanding than nosewheel flying.
That’s not opinion.
It’s design.
The very characteristics that make tailwheel aircraft more challenging are also the reason many pilots enjoy them so much.
A Great Wheel Landing Requires
Precision.
Patience.
Judgement.
Discipline.
Remember the Process
Master the Hold-Off Window.
Master the Step Down.
Touch.
Then Push.
And Remember
The purpose of the push is not to put the aeroplane on the runway.
The purpose of the push is to stop it flying again.
Fly the aircraft well and the landing will take care of itself.
Want to Become a Better Tailwheel Pilot?
This guide focuses specifically on mastering the wheel landing.
If you’re new to tailwheel flying or looking to accelerate your learning, the Stick ‘n Rudder Tailwheel Course covers the complete skill set required to operate tailwheel aircraft safely and confidently.
Disclaimer
This guide contains general information only.
If you are unsure about any of the manoeuvres or exercises described, seek guidance from a suitably qualified tailwheel flight instructor.
Always operate within the limitations of your aircraft, your experience, and the prevailing conditions.
Prepare for your practical tailwheel training with our online course. It features illustrations and interactive quizzes, along with written and video content by one of Australia’s most experienced tailwheel flight instructors.
ENTER “SAVE20” for a 20% DISCOUNT – VALID THIS MONTH ONLY!

